Audio Inspector
The Auphonic Audio Inspector appears on the results page of each finished production and offers a detailed, interactive overview of every adjustment made by our algorithms. Use it to compare input and output files, add or refine cuts, zoom and scroll through the waveform, jump to a specific spot via the automatic transcript, review comprehensive audio statistics, and more.
A screenshot of the Auphonic Audio Inspector on the status page of a finished Multitrack Production with minimized input tracks.
Cut Editing in the Audio Inspector
With the cut editing feature in the Audio Inspector, you can manually refine all machine-made cuts
and fine-tune your production to your liking. Adjust, deactivate or activate existing cuts, or add new cuts yourself.
To apply all our Automatic Cutting algorithms, you can, for instance, use our Auphonic Preset:
Cut Filler Words, Coughs and Silence.
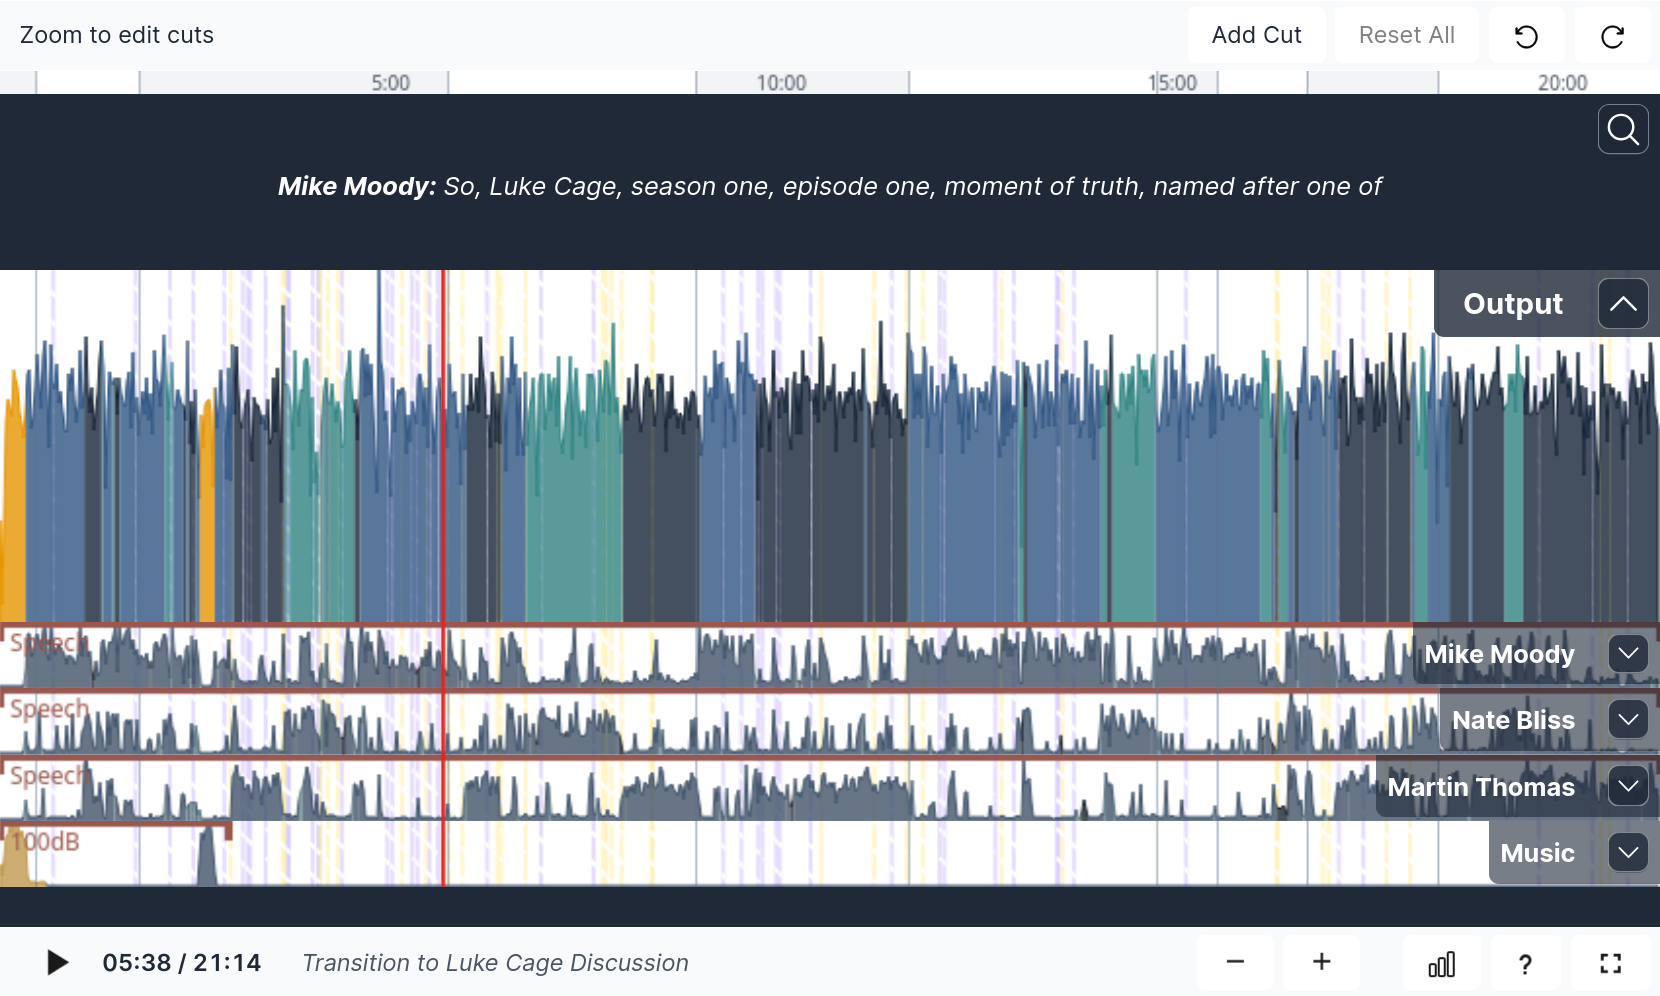
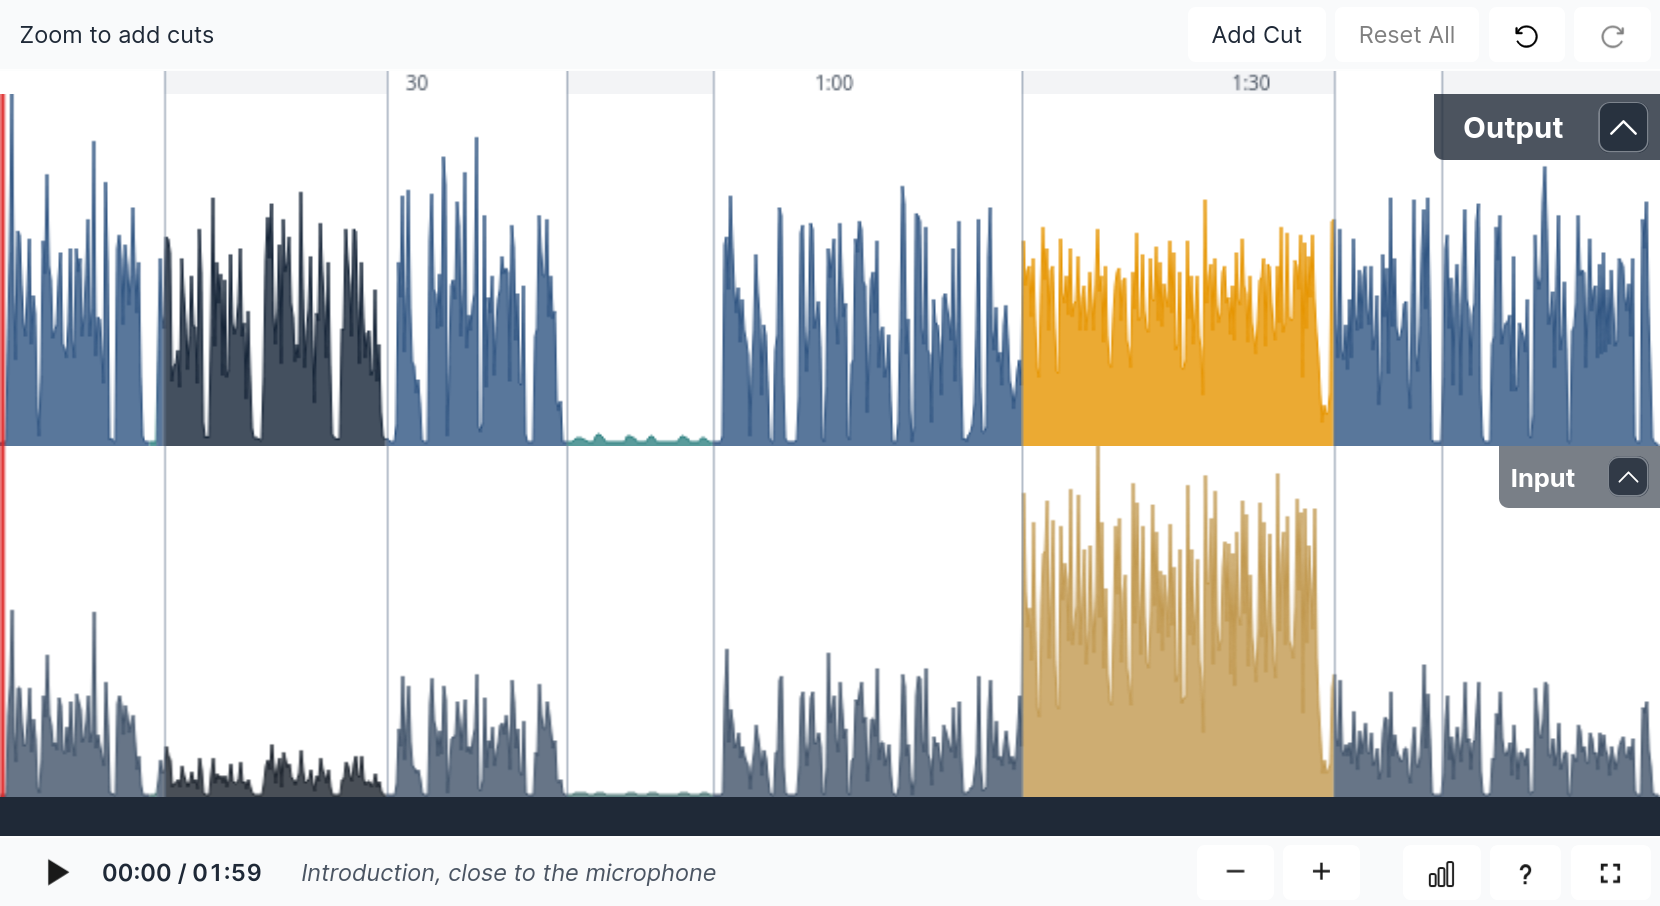
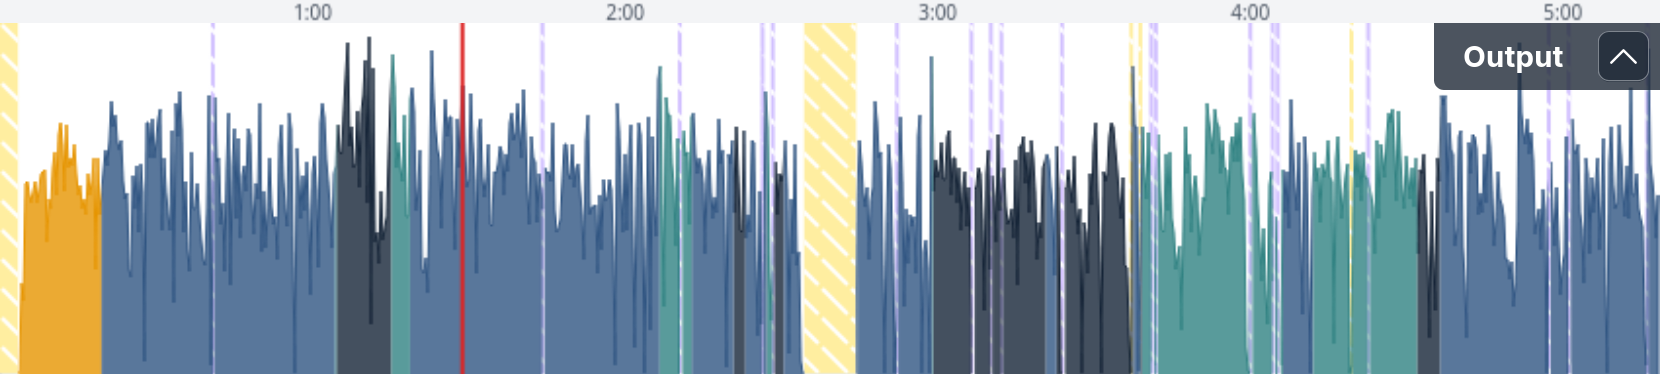
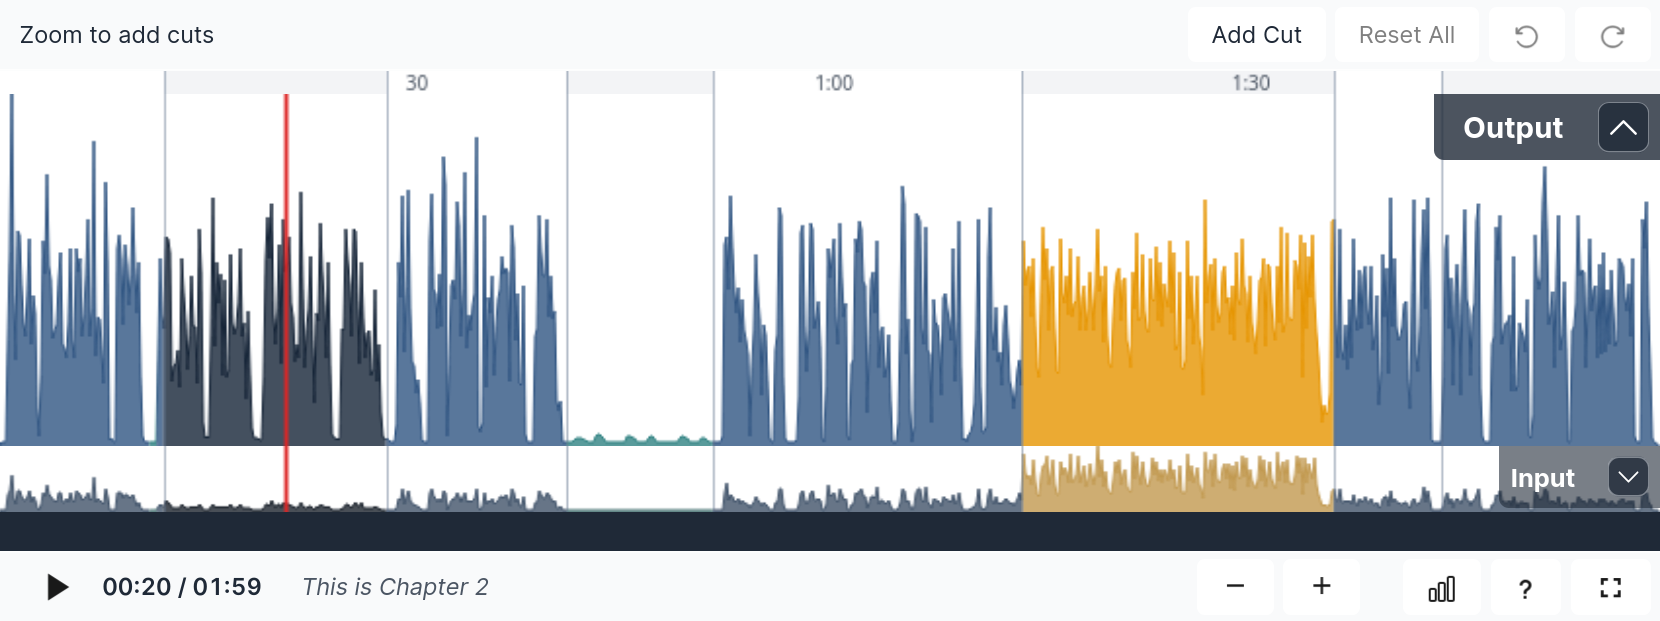
When your production is done you will reach the Result Page with our Audio Inspector:

view with a selected and deactivated filler cut
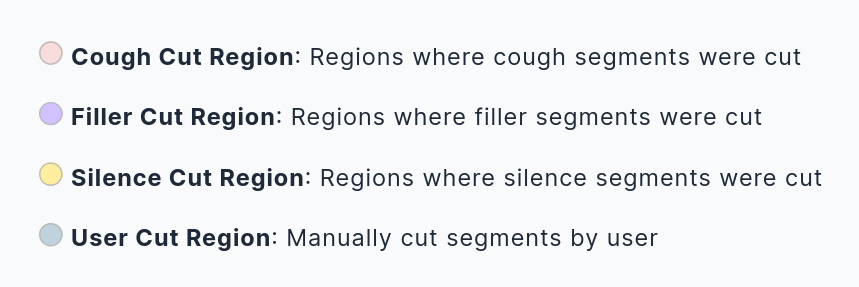
The type of the cutting events is diplayed by the following color code:
You can deactivate cuts either by selecting a cut and clicking [Deactivate Cut] in the top bar or by using the hotkey [C]. To add a user cut, set the playhead to the desired cut location and click [Add Cut] in the top bar or use the hotkey [C]. When you set a new cut region, you will notice the waveform of the output audio turning white. With the [Delete Cut] button, or by using the hotkey [Del], you can remove a selected user cut, and the waveform color will reset. (For an overview and descriptions of all controls and hotkeys, see the Controls and Shortcuts section.)
By clicking the [↺] button, you can undo every single cut-editing step one by one. (Similar undo the [↺] with the [↻] button.)
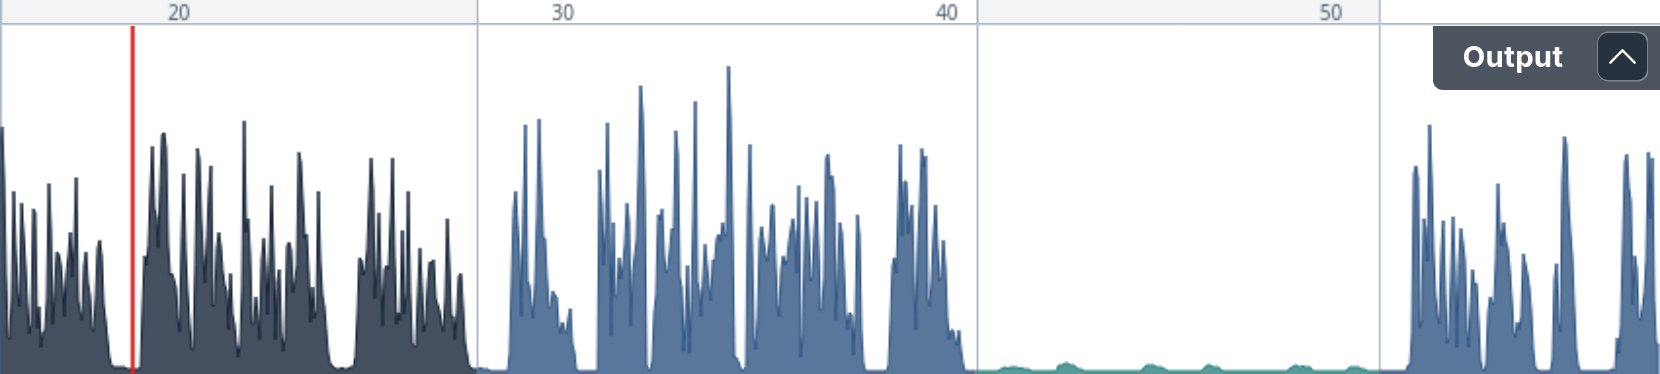
All cuts that deviate from the original Auphonic detection are marked with a red dot.
You can manually adjust the regions of all cuts using the arrow sliders at the edges of your selected cut, allowing you to fine-tune both machine-made and custom user cuts. If you do not enable the automatic cutting algorithms in the first place, obviously you can only add new cuts afterwards.
Pre-listen to your cut result by setting the red playhead before the cut and pressing [⯈] or the spacebar [SPACE].
Be aware that for pre-listening to deactivated cut regions, we have to fill in segments of the unprocessed input file as a preview,
until you [Apply Cuts] as described below. This might sound strange during pre-listening,
especially when your input audio is very quiet or noisy, but it will be fine after reprocessing.
If you are not happy with what you hear, you can either select one specific cut and press [Reset Cut] to revert it to the auto-detected position, or discard everything that was changed manually and start all over by pressing [Reset All]. The [Reset All] button completely resets all cuts to what Auphonic delivered automatically, so all red-dot-marked modifications will disappear.
Note
You can also [↺] undo the [Reset All] action, but only until you leave the page. If you leave the page, the current cut status is saved and the editing history is deleted!
When you are done editing, press [Apply Changes] at the bottom (or top) of the production page and re-run it for free:
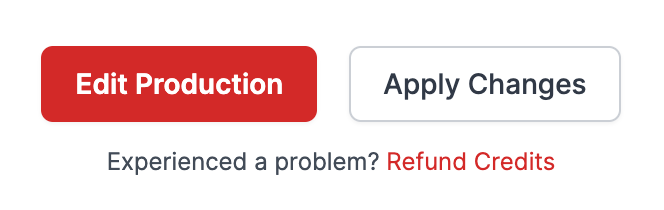
Auphonic will then re-process your production and apply all the cuts and edits you made. You can also press [Edit Production] if you want to change feature settings. Your cuts will be saved and applied when you start your production again with the updated settings.
Hint
Re-Processing is free and will not use additional credits!
All edits you make are free of charge - including changes to presets and feature settings.
So feel free to experiment with all the tools we offer.
However, once you have changed the input file(s), additional credits will be used.
Singletrack Algorithms Inspector
First, we discuss the analysis data of our Singletrack Post Production Algorithms.
The audio levels of output and input files, measured according to the ITU-R BS.1770 specification, are displayed directly as the audio waveform. Only one file is played at a time, click directly on the Input or Output track to unmute a file for playback:
Singletrack Production with opened input file.
See the first Leveler Audio Example to try the audio inspector yourself.
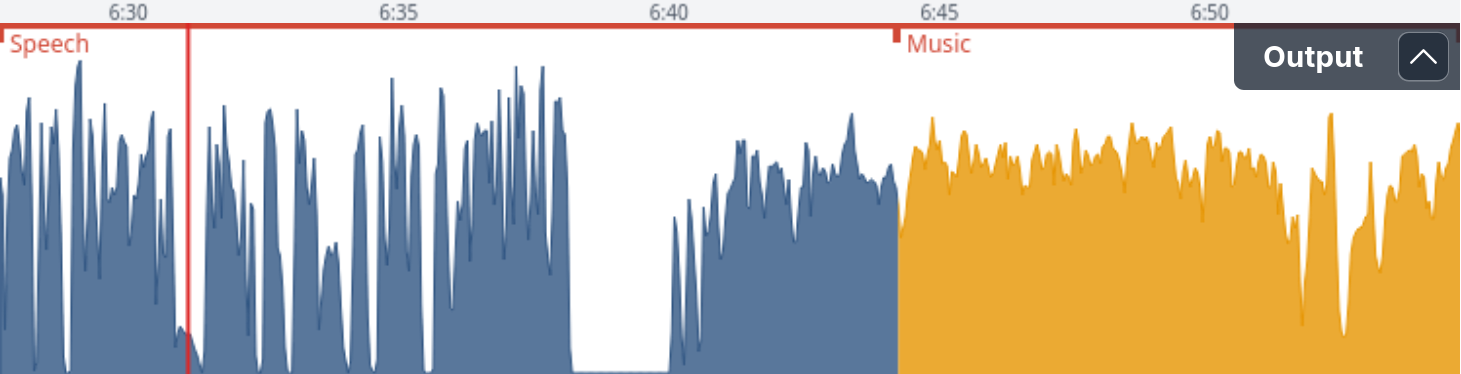
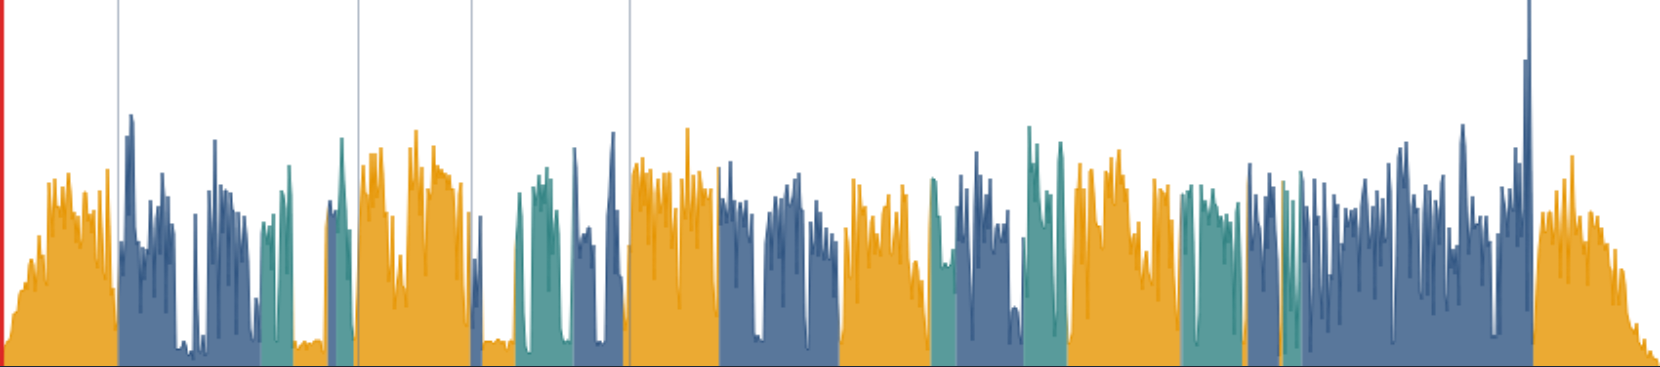
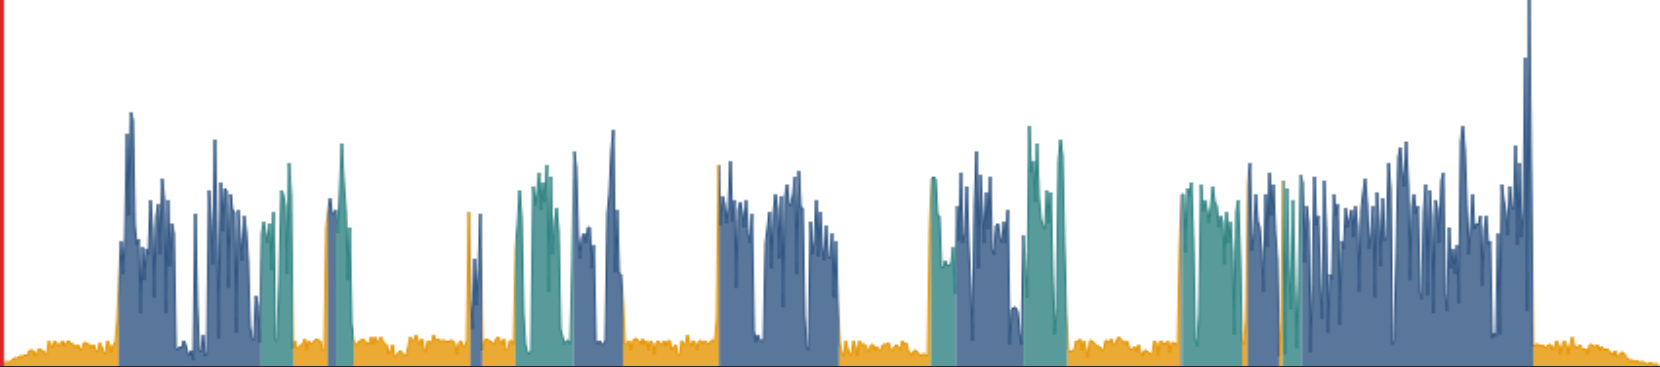
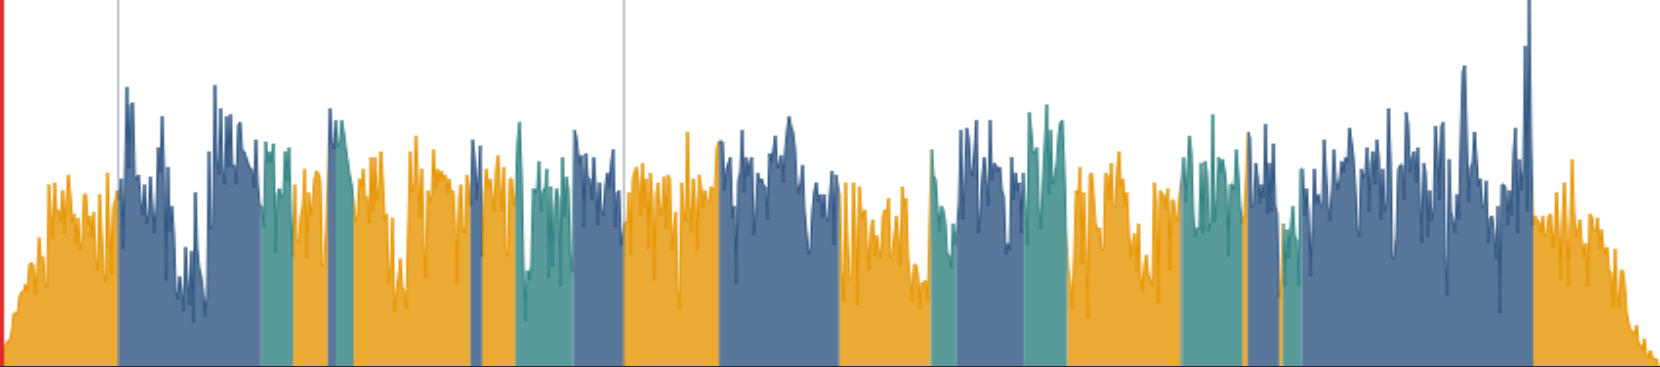
- Waveform Segments: Music and Speech (gold, blue)
Music and Speech segments are displayed directly in the audio waveform: Music segments are plotted in gold/yellow, speech segments in blue (or dark and light/turquoise blue).
- Waveform Segments: Leveler High and No Amplification (dark, light/turquoise blue)
Speech segments can be displayed in normal, dark or light blue: Dark blue means that the input signal was very quiet and contains speech, therefore the Adaptive Leveler has to use a high amplification value in this segment.
In light/turquoise blue regions, the input signal was very quiet as well, but our classifiers decided that the signal should not be amplified (breaths, noise, background sounds, etc.).
The horizontal red line displays information about the applied noise reduction algorithm.
- Horizontal Lines: Noise Reduction (red)
Our Noise and Reverb Reduction algorithms analyze your audio content and classify segments with different characteristics like speech, music, silence, individual speakers with distinct backgrounds, etc. to process every single segment with the best matching algorithms.
Depending on the chosen denoising method, different algorithms are used for your audio file and the red horizontal lines show the most important information for the applied denoising method:For the Dynamic Denoiser the top line displayes which parts of your audio are classified and denoised as Speech or Music segments.
The Speech Isolation model always uses the Speech algorithm, therefore the label will always be Speech.
If you select the Static Denoiser, the line description will always say Static.
For the Classic Denoiser, there are two lines where the top line shows the noise reduction amount and the bottom line shows the hum base frequency (50Hz or 60Hz).
You can try the singletrack audio inspector yourself with our Leveler and Noise Reduction audio examples.
Multitrack Algorithms Inspector
If our Multitrack Post Production Algorithms are used, additional analysis data is shown in the audio inspector.
The audio levels of the output and all input tracks are measured according to the ITU-R BS.1770 specification and are displayed directly as the audio waveform. Only one file is played at a time, click directly into the track to unmute a file for playback:
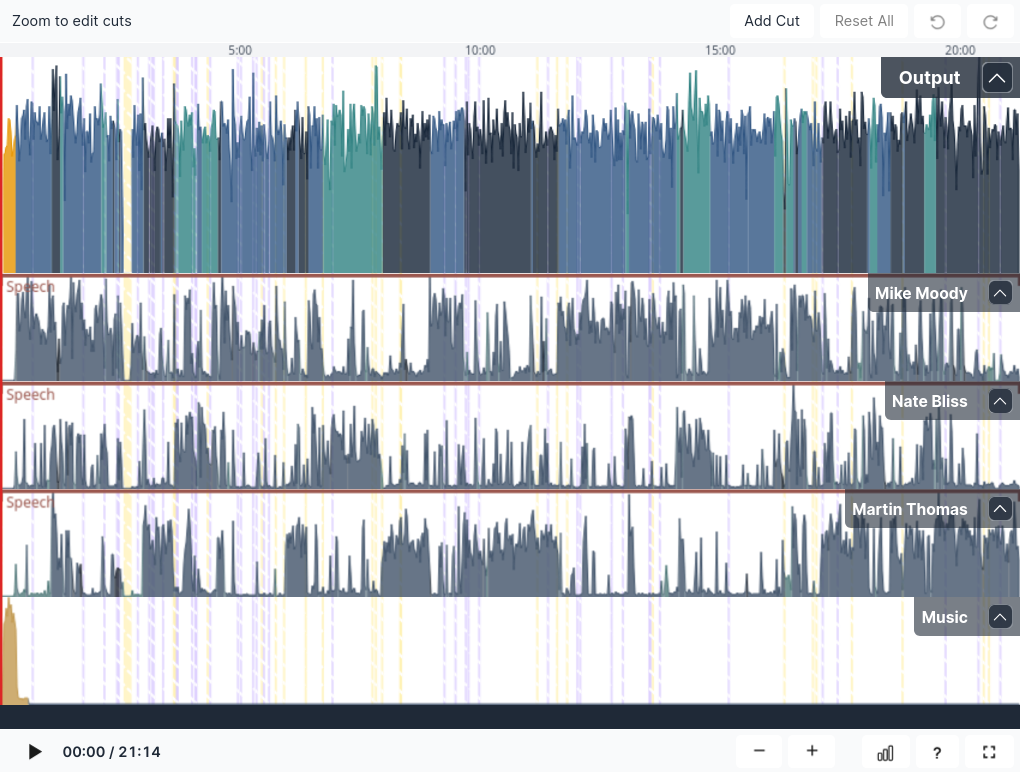
- Input Tracks: Waveform Segments, Background Segments and Horizontal Lines
Input tracks are displayed below the output file including their track names. The same data as in our Singletrack Algorithms Inspector is calculated and plotted separately in each input track:
Waveform Segments with different colors: Music and Speech Segments (gold, blue), Leveler High/No Amplification (dark blue, light/turquoise blue)
Horizontal Lines: Noise Reduction Information (red)
Cutting Regions: Cutting Region Legend (striped yellow, purple, red, blue)
- Output Waveform Segments: Multiple Speakers and Music
Each speaker is plotted in a separate, blue-like color - in the example above we have 3 speakers (normal, light/turquoise and dark blue) and you can see directly in the waveform when and which speaker is active.
Audio from music input tracks are always plotted in gold/yellow in the output waveform, please try not to mix music and speech parts in music tracks (see also Multitrack Best Practice)!
You can try the multitrack audio inspector yourself with our Multitrack Audio Inspector Example or our general Multitrack Audio Examples.
Ducking, Background and Foreground Segments
Music tracks can be set to Ducking, Foreground, Background or Auto - for more
details please see Automatic Ducking, Foreground and Background Tracks.
In the waveform, each active speaker in displayed in a different shade of blue,
while music segments are always shown in gold/yellow.
- Ducking Music Segments
In Ducking, the level of a music track is reduced if one of the speakers is active.
- Background Music Segments
Here the whole music track is set to Background and won’t be amplified even when speakers are inactive.
- Foreground Music Segments
If the whole music track is set to Foreground, its level won’t even be reduced when speakers are active.
You can try the ducking/background/foreground audio inspector yourself: Fore/Background/Ducking Audio Examples.
Audio Search, Chapters Marks and Videos

- Audio Search and Transcriptions
If our Automatic Speech Recognition Integration is used, a time-aligned transcription text will be shown above the waveform. You can use the search field to find and jump to specific parts of the audio file.
See our Speech Recognition Audio Examples to try it yourself.
- Chapters Marks
Chapter Mark start times are displayed in the audio waveform as grey vertical lines.
The current chapter title is written below the waveform in the Control Bar - see “This is Chapter 2” in the screenshot above.

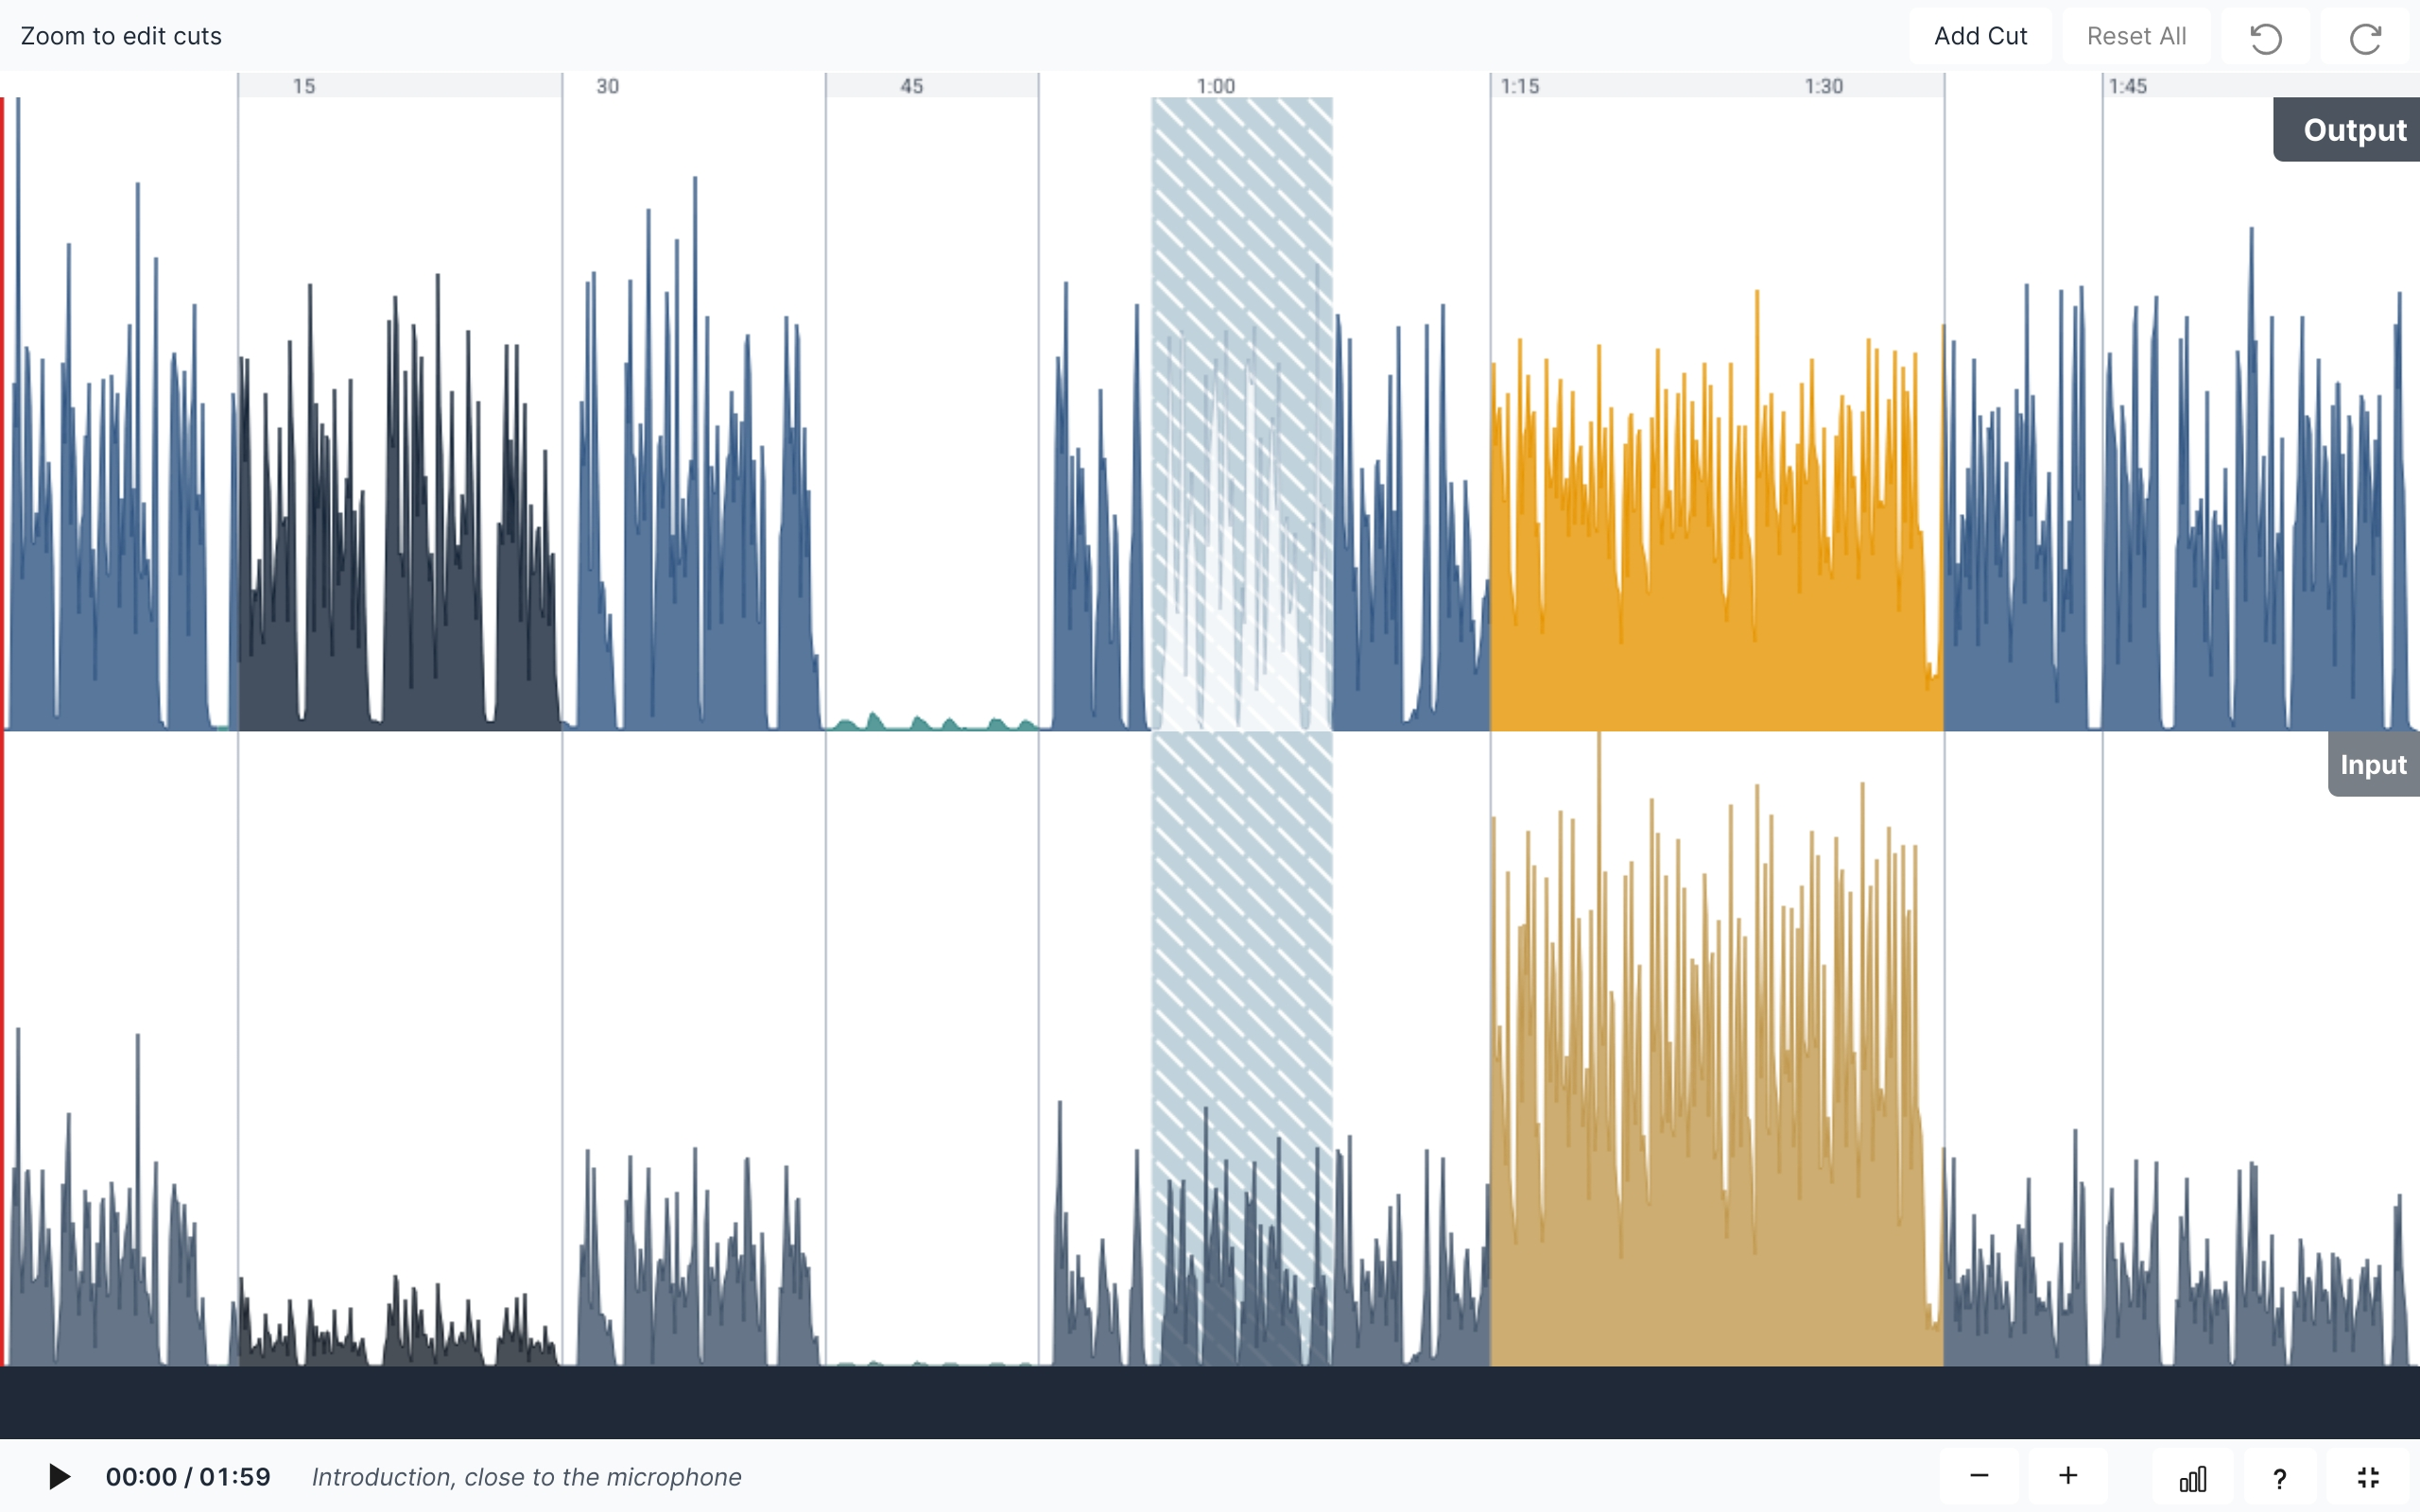
A video production with output waveform, input waveform and transcriptions in full-screen mode.
Please click on the screenshot to see it in full resolution.
- Video Display
If you add a Video Format or Audiogram Output File to your production, the audio inspector will also show a separate video track in addition to the audio output and input tracks. The video playback will be synced to the audio of output and input tracks.
Mobile Audio Inspector
To make the best use of screen space on both Android and iOS devices, various responsive layouts were designed and now there is full usability on mobile devices: You can tap the waveform to set the playback position, use pinch-gestures to zoom in/out and view details. Swipe horizontally to scroll trough waveform positions and vertically for multitracks, etc.
Unfortunately, the full-screen mode is not available for iOS mobile (thanks to Apple), but it works on Android devices and is a really great way to inspect your productions using all the available screen space:
Audio inspector in horizontal full-screen mode on Android.
Audio Processing Statistics
The audio processing statistics show analysis details about input and output audio files.
Click on the [.ıI.] button in the Control Bar to display tables with statistics:
Singletrack Audio Processing Statistics
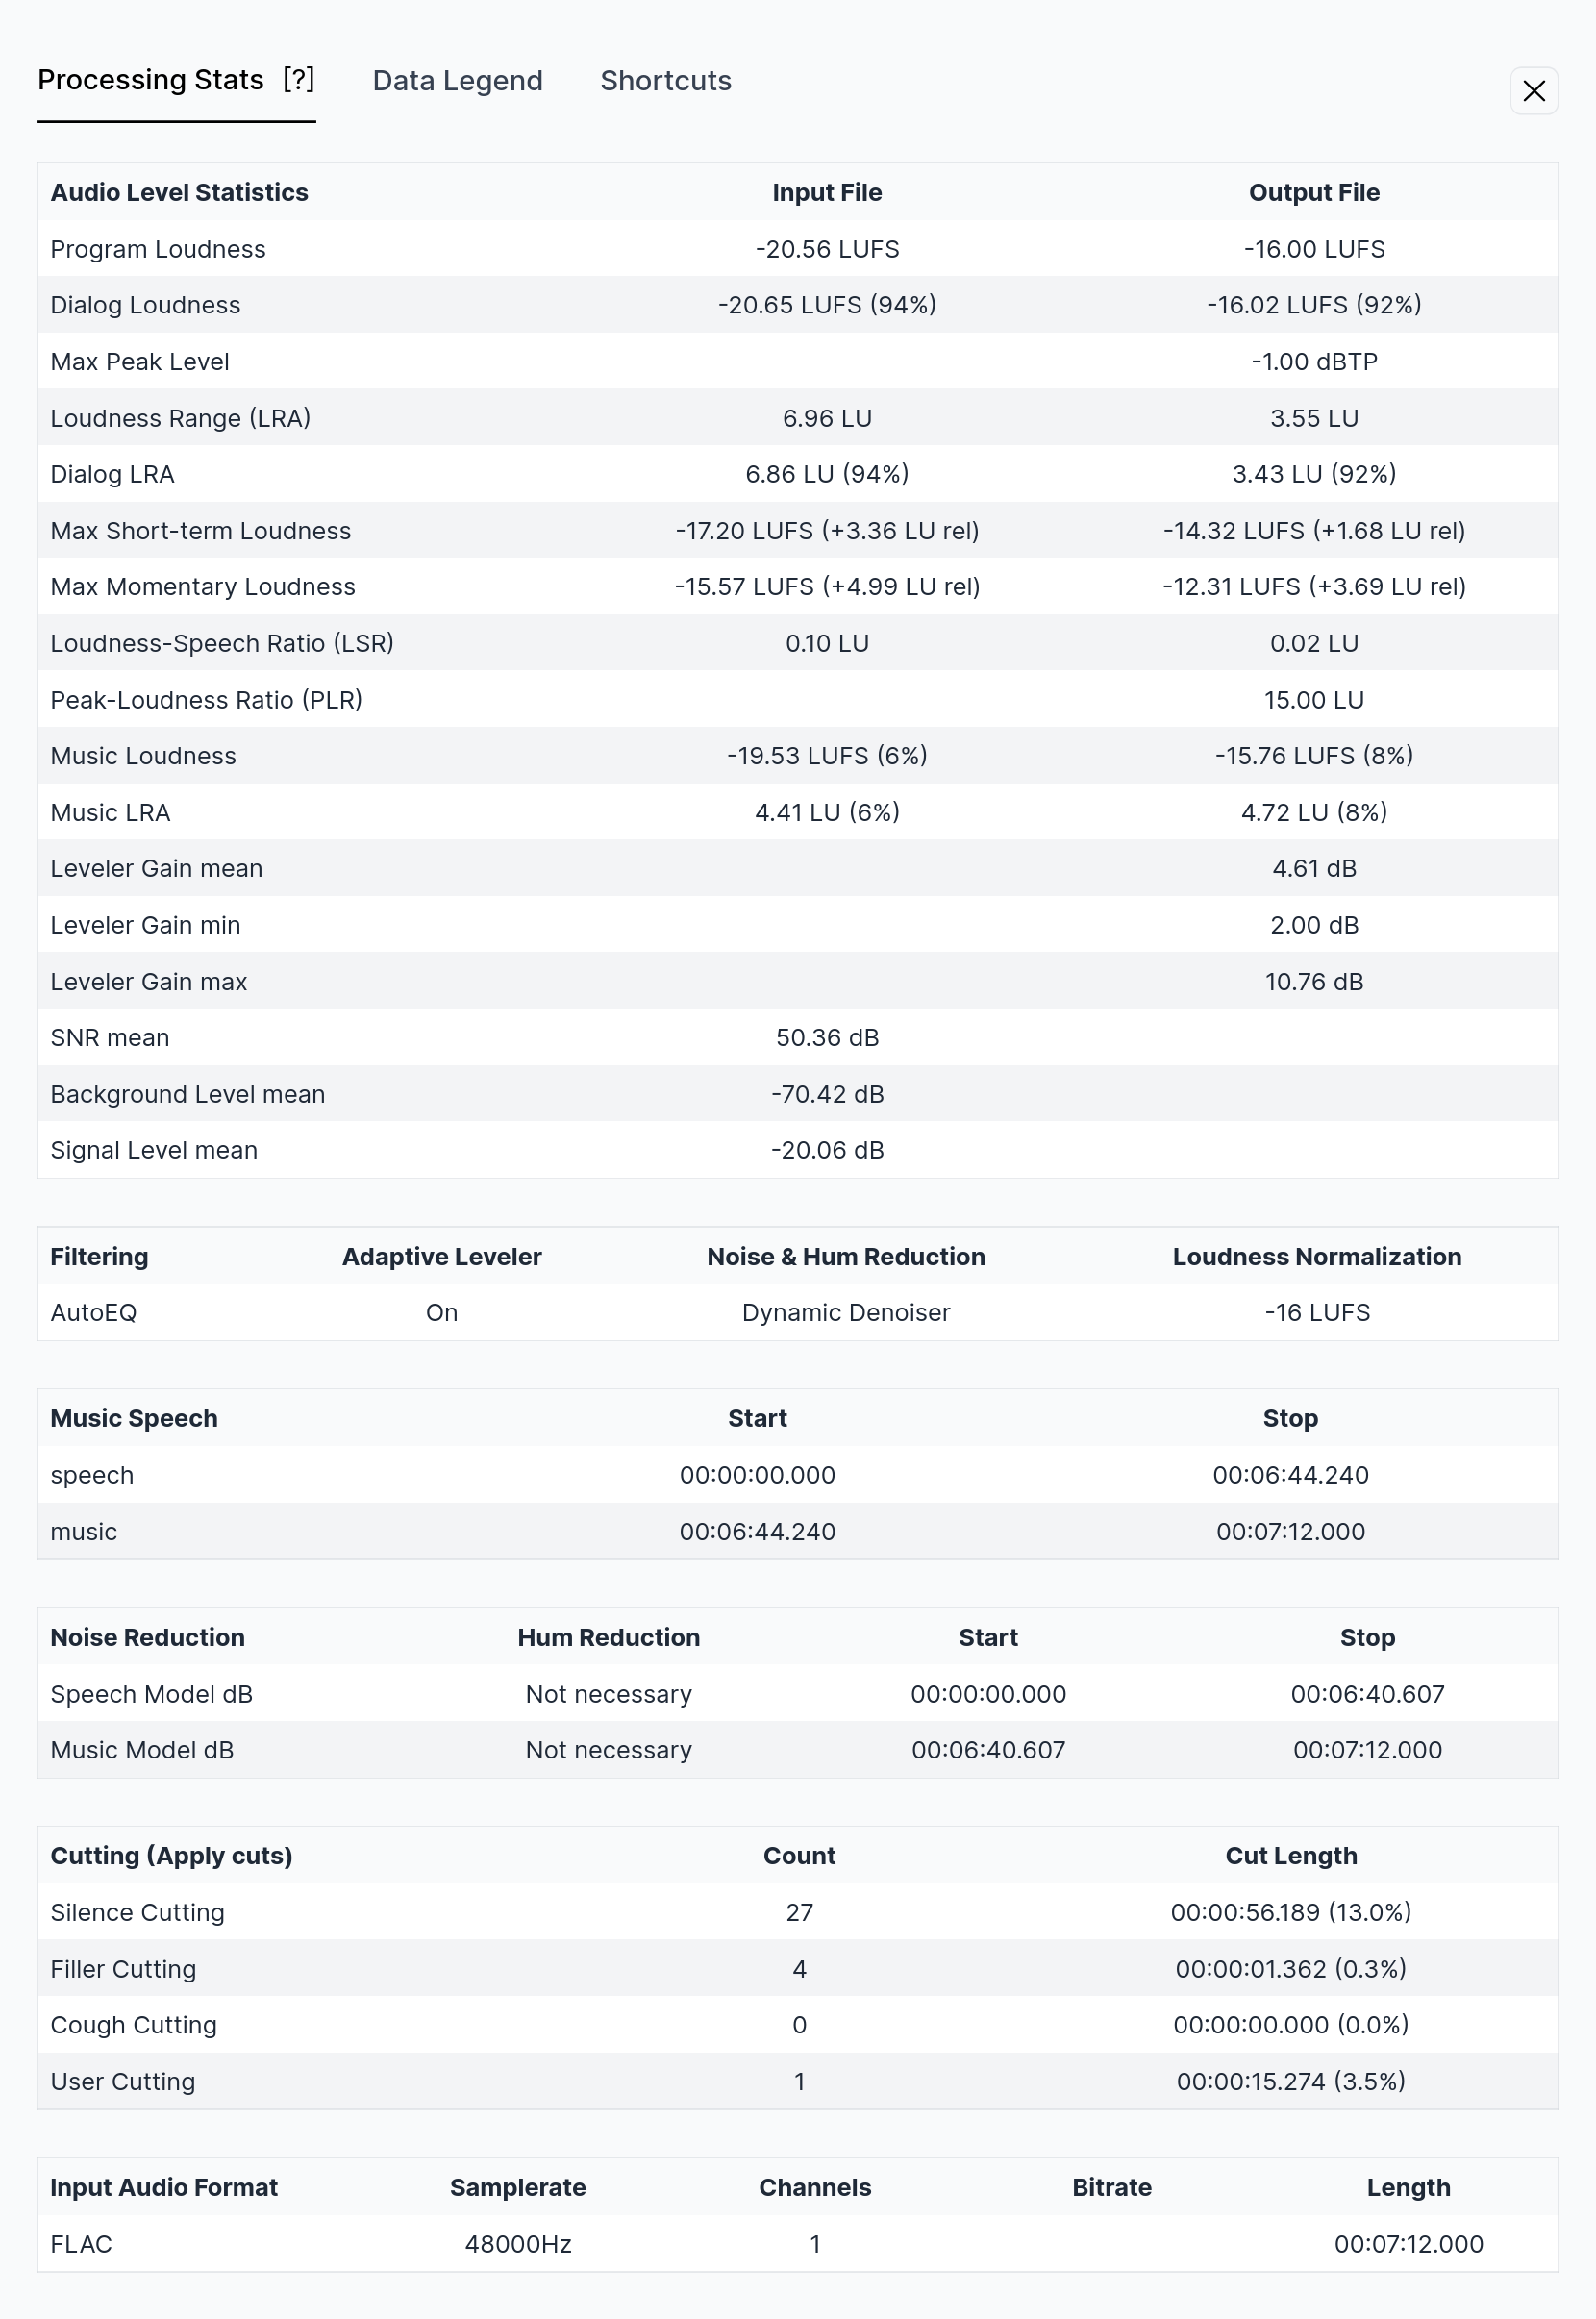
Auphonic processing statistics of a Singletrack Production.
- Audio Level Statistics Table
This table lists information about the loudness and levels of input and output audio files.
These statistics can be used to check compliance with Loudness Standards (Programme Loudness, Maximum True Peak Level, Loudness Range / LRA - see Loudness Measurement and Normalization) and certain regulations for commercials (Max Momentary Loudness, 400ms integration time; Max Short-term Loudness, 3sec integration time - see EBU TECH 3341, Section 2.2).
The table also provides loudness statistics for dialog and music parts (Dialog Loudness, Dialog LRA, Music Loudness, Music LRA and Loudness-to-Speech Ratio / LSR - see Dialog Loudness Normalization for Cinematic Content).
Furthermore, it shows how much our Adaptive Leveler changes levels (Leveler Gain mean, min, max) and lists statistics about input audio signals (Signal-to-Noise Ratio/SNR, Background Level, Signal Level).- Algorithms Overview Table
Shows processed seetings for Filtering, Adaptive Leveler, Noise & Hum Reduction, and Loudnes Normalization
- Music Speech Segments Table
Lists music and speech segments of a production. Very short speech/music segments are not displayed.
- Noise and Hum Reduction Table
Lists how much Noise Reduction and/or Hum Reduction was used in which segment of the output audio file.
- Cutting Table
Displays how many Cutting Regions have been detected or user-added and their cumulative length in total and in percent.
- Input Audio Format Table
Shows details about the input audio format (Format, Samplerate, Channels, Bitrate, Length).
Multitrack Audio Processing Statistics
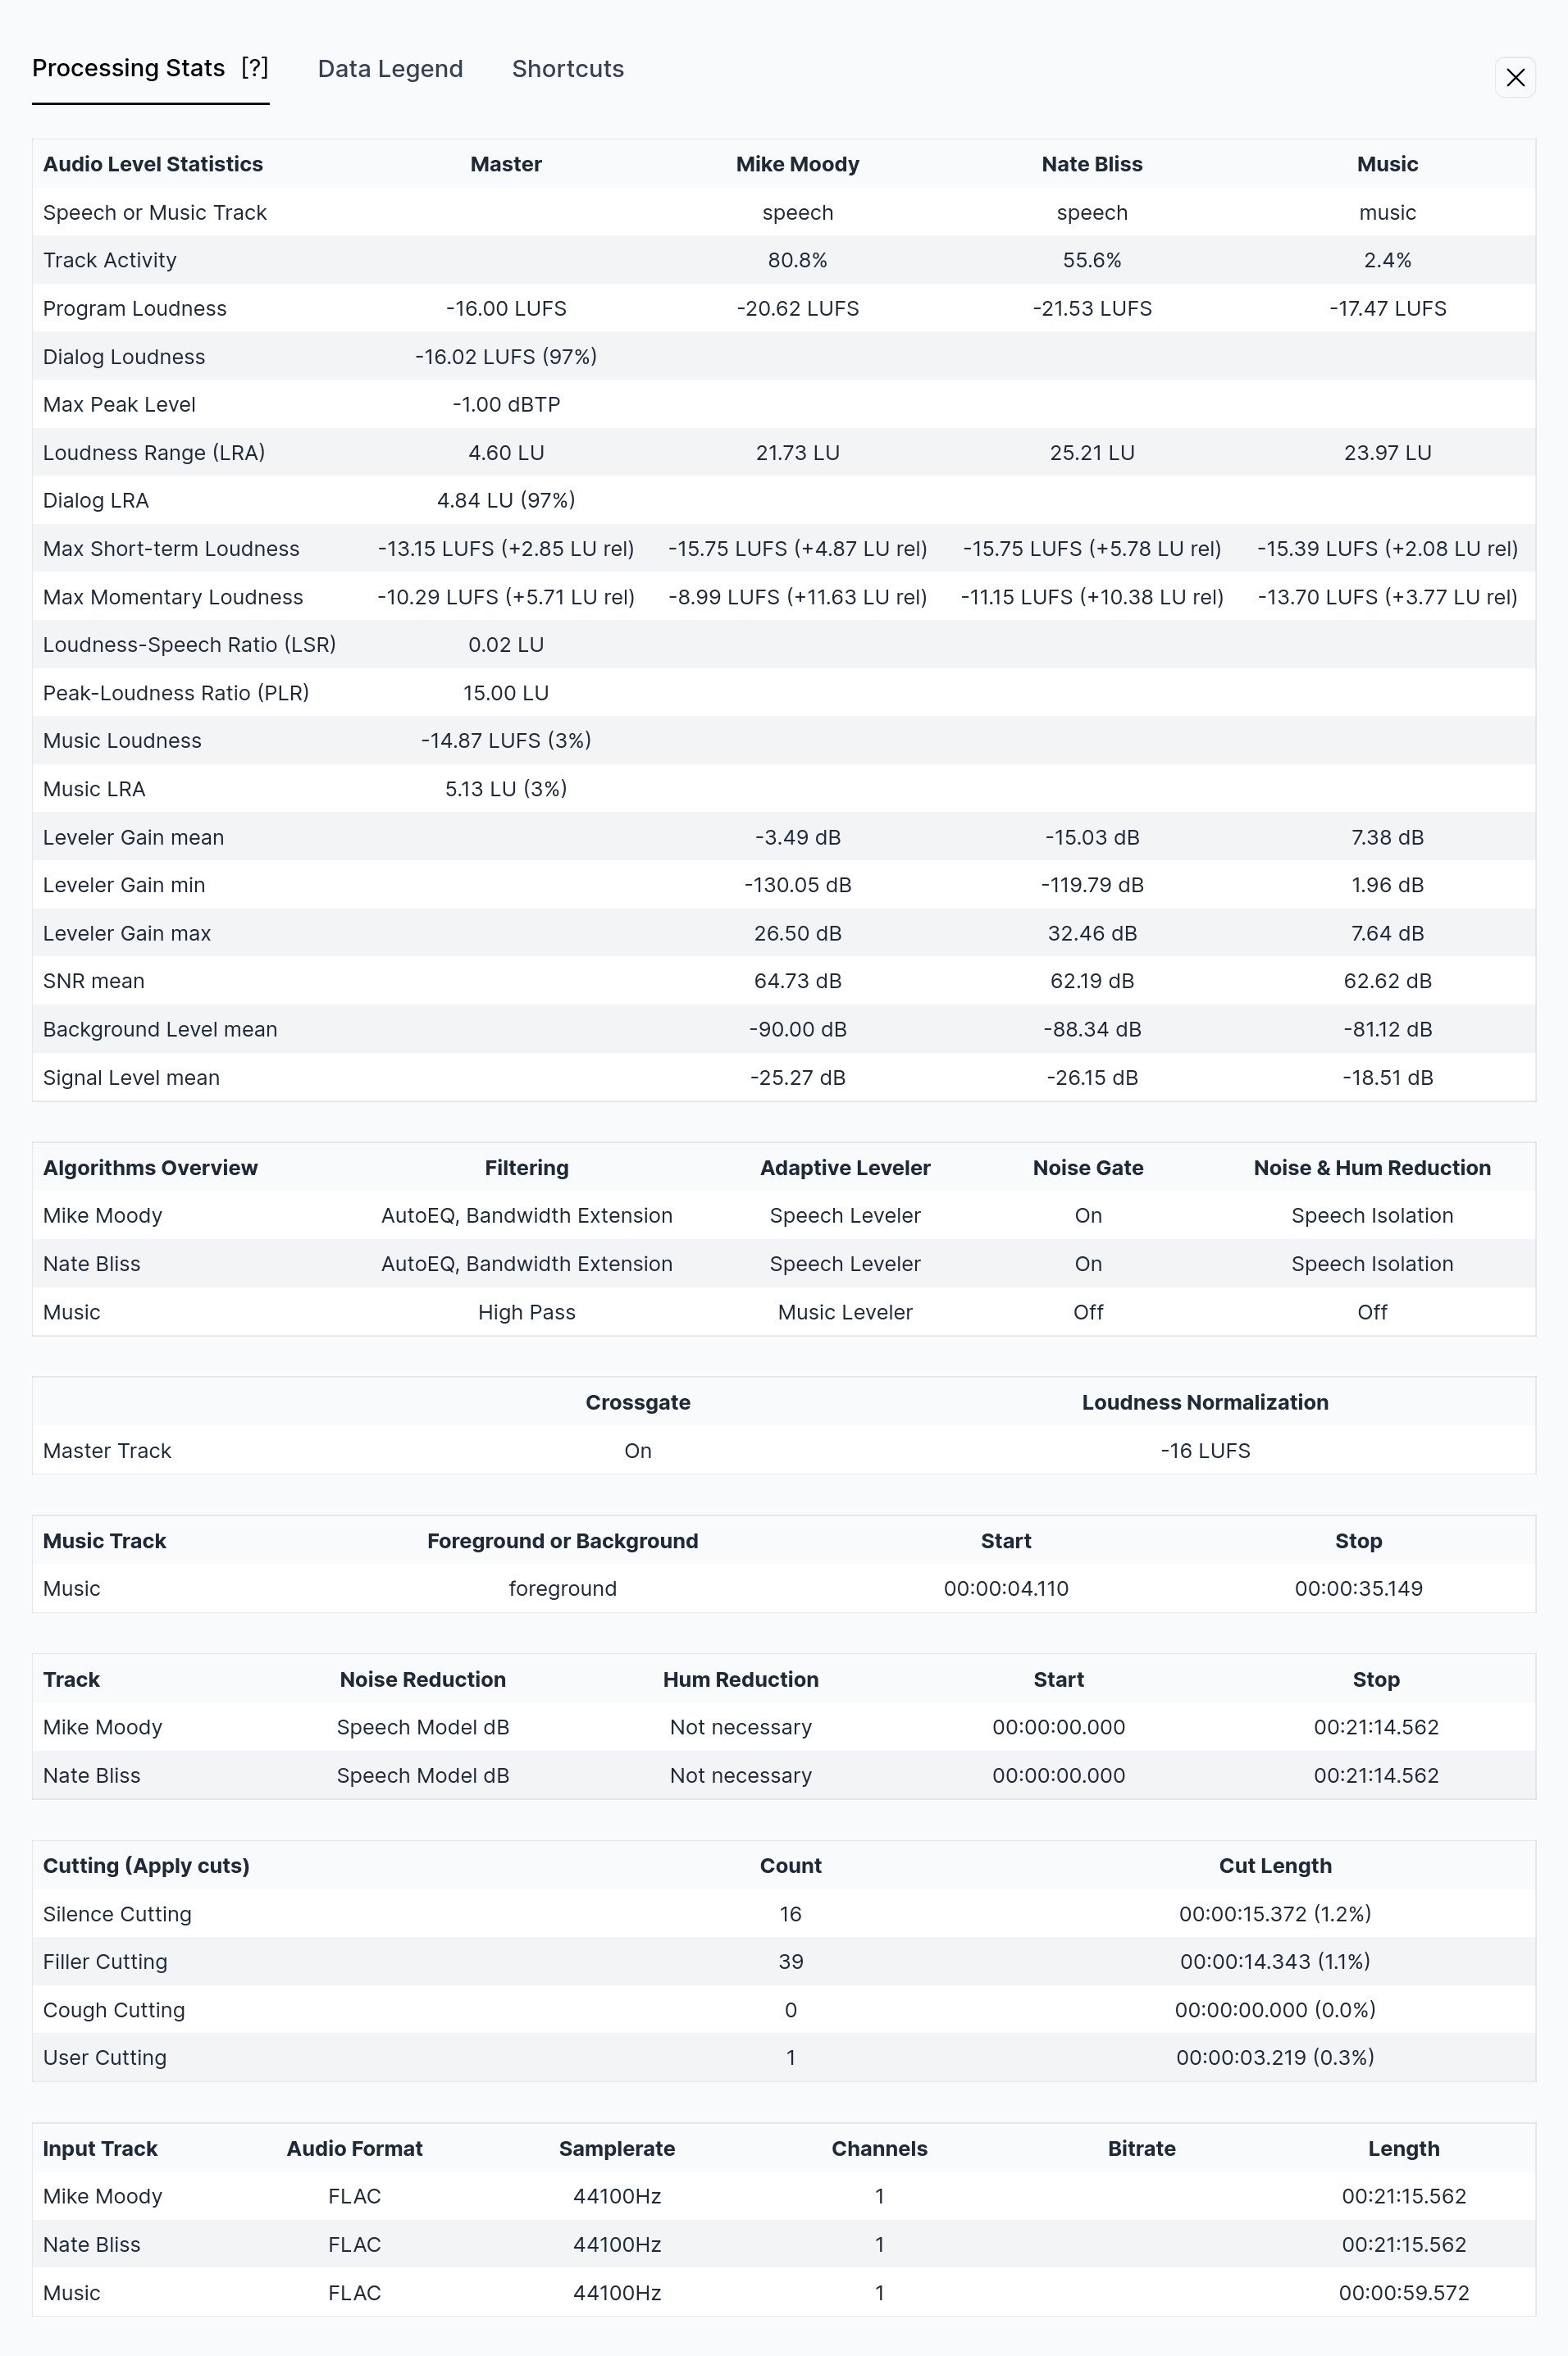
Auphonic processing statistics of a Multitrack Production.
- Audio Level Statistics Table
Lists information about the loudness and levels of all input files/tracks (Mike Moody, Nate Bliss and Music in the screenshot above) and the output audio file (Master). Values per track are the same as in our Singletrack Audio Processing Statistics.
Additionally, it shows if a track was classified as music or speech (Speech or Music Track) and the activity in percent of each speaker/track.- Algorithms Overview Table
Shows processed seetings for Filtering, Adaptive Leveler, Noise Gate, and Noise & Hum Reduction
- Music Track Segments Table
Lists active segments in each music track. Each segment can be in foreground, background or ducking - please see Automatic Ducking, Foreground and Background Tracks.
- Noise Reduction Table
Lists how much Noise and/or Hum Reduction was used in which segments of each track.
- Input Track Audio Format Table
Shows details about input audio files/tracks (Format, Samplerate, Channels, Bitrate, Length).
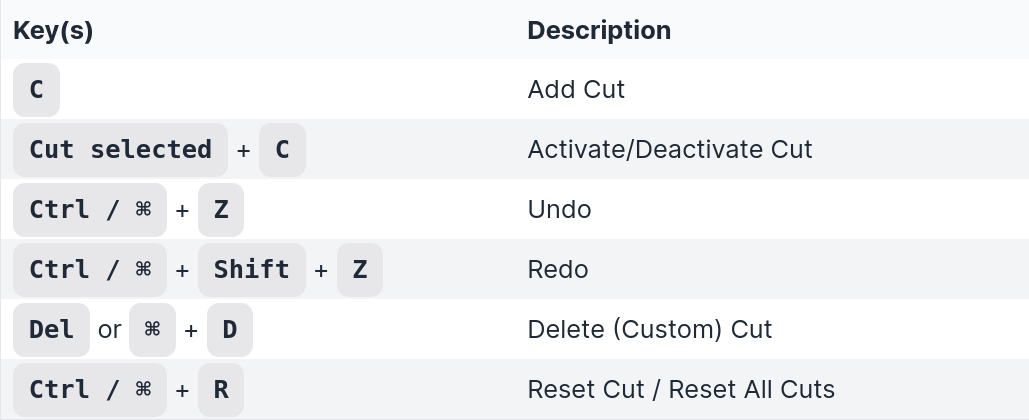
Controls and Shortcuts
Playback Contols

Control bar of the Audio Inspector with scrollbar, play/pause button,
current playback position, production length and chapter title on the left.
On the right, buttons to zoom in/out, toggle statistics, show legend and switch to full-screen mode.
- Seek in Audio Files
Click or tap inside the waveform to seek in files. The red playhead shows the current audio position.
- Play Audio
Click [⯈] or press [SPACE] on your keyboard to start playback at the current position of the red playhead.
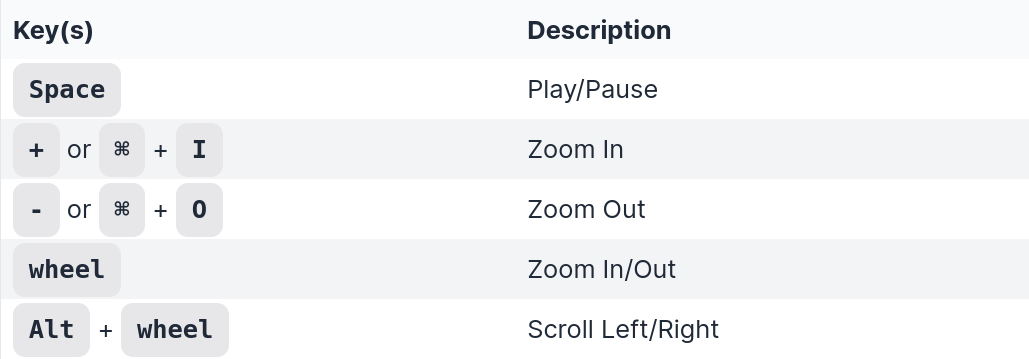
- Zoom In/Out
Use the zoom buttons ([+] and [-]), the mouse wheel or zoom gestures on touch devices to zoom in/out the audio waveform.
- Scroll Waveforms
If zoomed in, use the scrollbar or drag the audio waveform directly with your mouse or by sliding on your touch device.
- Show Stats
Use the [.ıI.] button to show or hide the Audio Processing Statistics of a production.
- Show Legend
Click the [?] button to show or hide the legend, which describes details about the visualizations of the audio waveform.
- Full-screen Mode
Toggle the [ ⛶ ] button (bottom right) to switch to full-screen mode.
In full-screen mode all tracks are shown in detail using your whole screen and the controls for playback, zooming, cutting, text search, etc. are all still working.
(Unfortunately full-screen mode is not available for iOS mobile devices.)
Cut Editing Controls

default view
- Add Cut
Insert a new cut at the selected position by clicking [Add Cut].
- Reset all
Restore all cuts to their original auto-classified positions by clicking [Reset All].
- Undo
Revert your last cut edit by clicking the [↺] “undo” button. (Works only until you leave the production page.)
- Redo
Reapply your reverted action by clicking the [↻] “redo” button. (Works only until you leave the production page.)

view when edited cut is selected
- Deactivate Cut
Disable the selected cut without removing it by clicking [Deactivate Cut].
- Delete Cut
Remove a cut by clicking [Delete Cut]. (Only appears for self-added cuts.)
- Activate Cut
Enables a previously deactivated cut by clicking [Activate Cut]. (Button appears, when edited cut is selected.)
- Reset Cut
Enable a previously deactivated cut by clicking [Reset Cut]. (Button appears, when edited cut is selected.)
Keyboard Shortcuts
- Hotkeys for Playback:
- Hotkeys for Cutting: